

How to create a multi user device configuration in Intune
Written by Connor Dean | Modern Workplace Specialist
Intro
Organisations may operate with desktops that aren't assigned to a single person. This may be for hot desking purposes or something else specific to their organisation.
This sort of requirement requires a specific multi user configuration. This is something we can solve utilising Intune and Autopilot.
Please ensure you have Intune Administrator for these actions
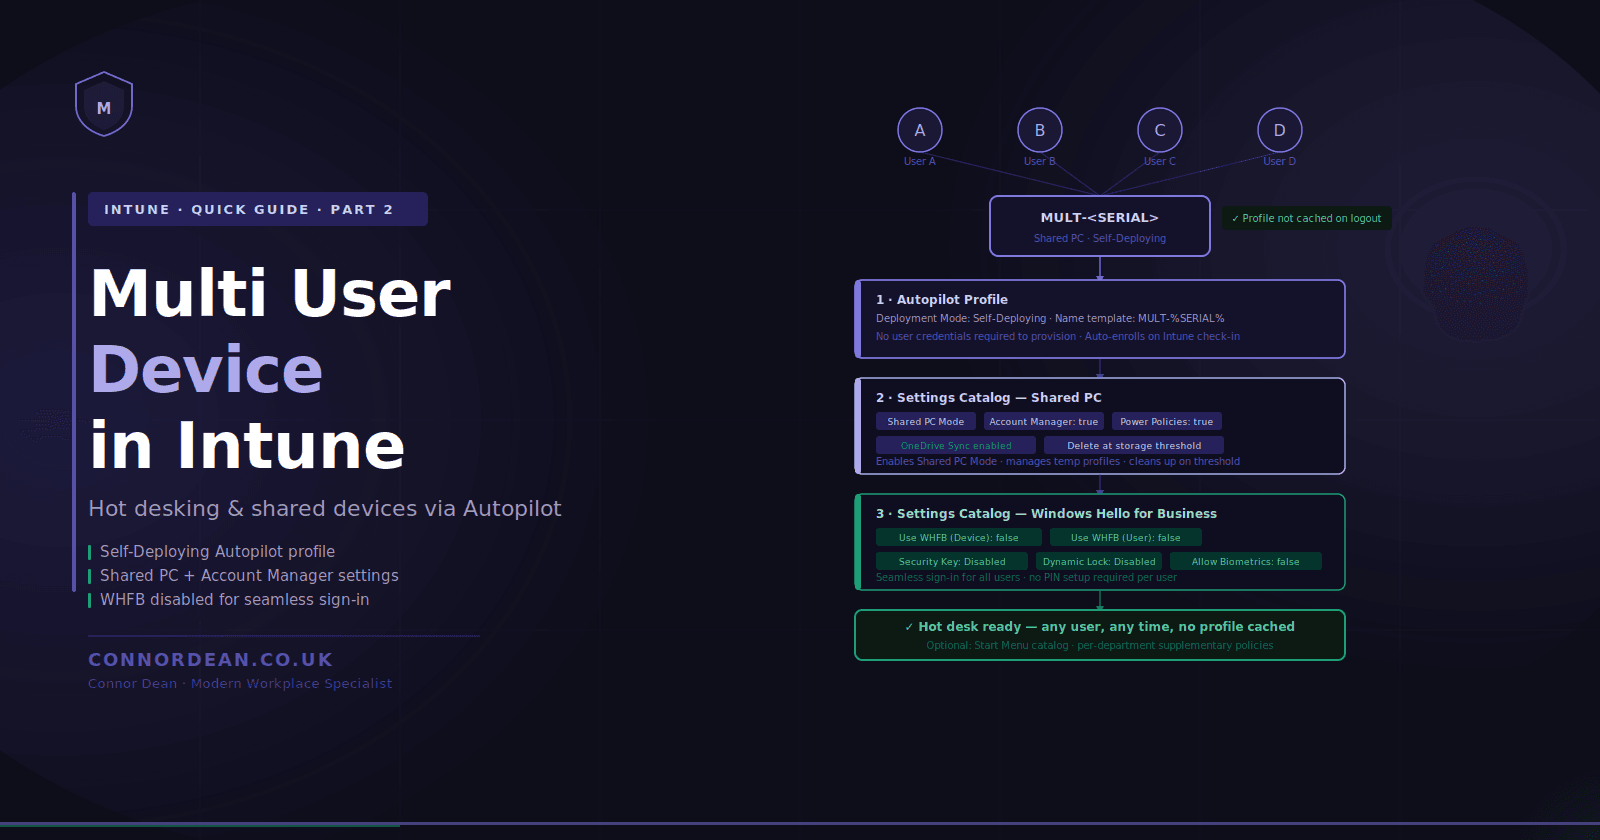
Configuring the Autopilot profile
Start by navigating to Windows Autopilot deployment profiles - Microsoft Intune admin center.
Select Create profile then Windows PC.
Give the profile a name and description so other admins are aware of the utilisation for this device. I've chosen Autopilot Multi User Desktops.
Then ensure on the next screen that Deployment mode is set to Self-Deploying. This will grey out a number of options, you can still choose the language, keyboard and assign a device name template. I've gone for MULT-%SERIAL%.
A self deploying profile is a profile where the devices are not associated with the user enrolling the device and user credentials are not required to provision the device.
The profile will automatically start the enrolment once it has checked in with the Intune service.

Assign this to your Multi User Device Group (this can either be a static or dynamic device group).
Configuration Profiles
Navigate to Create a profile - Microsoft Intune admin center and select Create
Settings Catalog - Shared PC
The first part of our policy will be using the Shared PC category.
I've chosen the following settings as we don't require the Kiosk Mode, and we will be using Shared PC Mode with One Drive as I'm planning to restrict access to certain parts of C:\.
I would recommend at minimum enabling the following:
Enable Shared PC Mode (or with OneDrive Sync)
Enable Account Manager - true
Set Power Policies - true
Deletion Policy - (Whatever you prefer but you would benefit from removing at a certain threshold)

Settings Catalog - Windows Hello For Business
To ensure the device has seamless sign in, we must disable WHFB. Find the category within the settings catalog and then ensure the following settings are selected.
Use Windows Hello For Business (Device) - Set to false
Use Windows Hello For Business (User) - Set to false
Use Security Key For Signin - Set to Disabled
Dynamic Lock - Set to Disabled
Allow use of Biometrics - Set to False

Assign the policy to your autopilot group and that is complete.
Optional - Settings Catalog - Start Menu configuration
If your organisation requires certain things on the start menu, or you just feel like the start menu shouldn't be edited then you can configure some further controls. For my setup I have chosen the following.
File Explorer

Start

How does deployment look?
In OOBE, once the network is done, it will automatically pull the Intune Autopilot profile (it may restart) and will start the onboarding process.

At the account setup stage there is the requirement for a user login, however after we've done our deployment we can see the user experience when logging in and out.
My machine has deployed, if I login with my user credentials we get straight in, no WHfB needed.


If we restart the machine we can see then that the user profile is not cached.

The next user who signs in won't have to do WHfB either, therefore you have an easy multi user build!
Closing notes
Multi user builds are ideal for when device sharing is needed, to save money on standalone user desktops and to simplify hot desks internally.
With your new build you can go further and customise it for different department or office areas. Keep the initial Autopilot build group and then apply custom supplementary settings catalog, policies and apps to make it easier for your users.
I hope this helps you in your Intune journey :)


